


The Importance of Proper Saltillo Tile Installation and Sealing
August 14, 2023 Rustico Tile Staff All Blogs, Cantera Stone, Cement Tile, Saltillo Tile Installation Guide, Installation Products, mexican floor tile, saltillo tile Social Share
Are you doing Saltillo tile installation research? Then keep reading – we will help you save time and money with valuable information and tips to ensure you know how to install Saltillo tile so you accomplish a long-lasting clay tile floor.
This post dives into the importance of
- installing sealed Saltillo correctly
- considering sealed vs. unsealed tiles
- following the proper process for installing Saltillo tile
- and using the correct installation materials and tile sealers
Vamos!
Table Of Contents
Unsealed vs. Sealed Saltillo – Why it Matters to the Installation Process
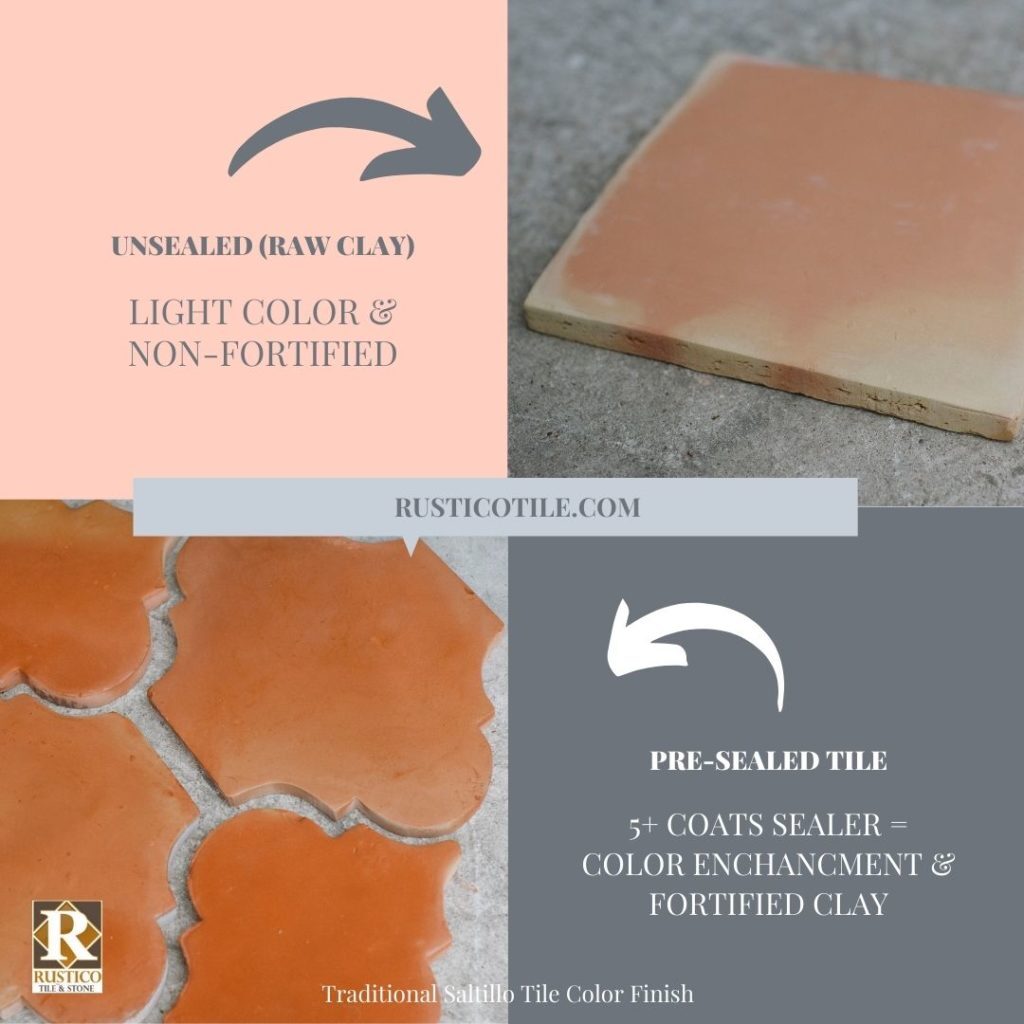
Many people think they’ll save money by purchasing unsealed Saltillo tiles with the intent of applying sealer on the job site. In most instances, this is untrue.
#1 Tip: Always buy presealed Saltillo tiles to save time and money for your project. Unsealed tiles may cost less upfront. Still, you’ll spend significantly more money trying to install and seal those cheaper options. Our artile, Why to Buy Sealed Saltillo Tile, breaks down the numbers if you want to geek out a bit.

Does Saltillo Tile Need To Be Sealed?
Installing sealed Saltillo tiles versus unsealed ones impacts the installation process and the overall outcome of your project due to several factors:
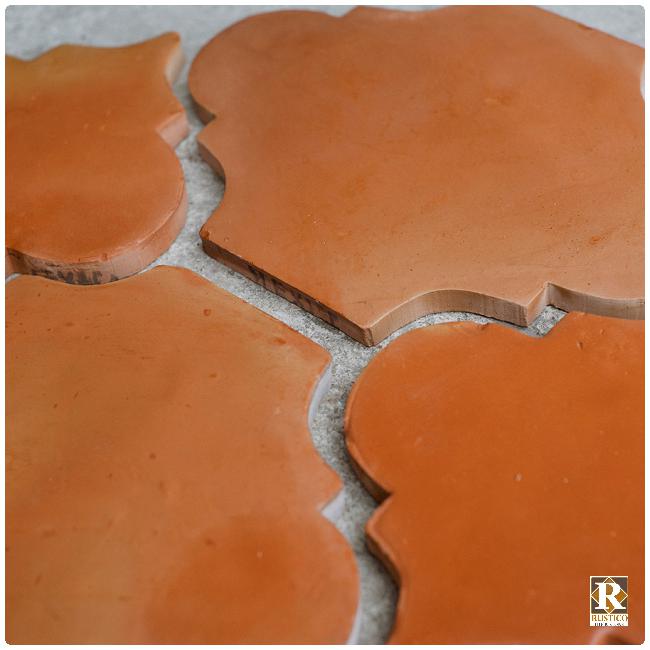
1. Protection During Installation: Sealed Saltillo tiles from Rustico are pretreated with several layers that prevent staining, water absorption, and surface damage. This makes the installation process easier (and faster!) since the tiles are less prone to absorbing moisture, grout, or adhesive during installation.
2. Adhesive Application: Unsealed Saltillo tiles are more porous and absorb moisture from the grout and thinset during installation. This leads to uneven drying, adhesion issues, and stains. Sealed tiles are less likely to absorb excess moisture. So, they have better adhesive bonding.
3. Efflorescence: Efflorescence is the white powdery residue that appears on the surface of unsealed Saltillo tiles. This is due to the migration of minerals and salts within the clay tiles. Sealing the tiles before installation reduces the formation of efflorescence. Thus, it results in a cleaner and more consistent appearance.
4. Maintenance: Sealed Saltillo tiles are generally easier to clean and maintain since the sealant forms a protective barrier that prevents dirt, stains, and liquids from penetrating the tile’s surface.
5. Longevity: Sealed Saltillo tiles tend to have a longer lifespan due to the protection offered by the sealant. This means you protect your initial investment with a longer-lasting floor that requires little maintenance.
6. Aesthetics & Durability: Sealing Saltillo tiles before installation enhances their color, depth, and overall appearance. Plus, the layers of sealer that penetrate the tiles fortify them for added durability.
Do we ever recommend unsealed tiles?
Yes. If you want to custom-stain or glaze Saltillo tiles for a specific project or match older tiles, buy unsealed tiles. Otherwise, avoid the added time, labor, and sealer cost of taking on the sealing process during installation.
Need design tips, photos, and advice?
Rustic Dwelling Place
Buy The Right Tile For Your Project
Obviously, we feel passionate about the topic of Saltillo tile sealer. We’ve seen it all – the good, bad, and costly. How can you find the right tile for your project?
- Buy Saltillo tiles presealed from a quality supplier. Ensure the supplier has fully sealed the tiles with quality sealer… not just primed them with 1 or 2 coats of low-quality tile sealer. After installing the floor, apply the final coat (topcoat) sealer. So do it right from the onset so your Saltillo tile installation is quick and easy. This saves money and reduces ongoing maintenance.
- Explore options for patterns, shapes, sizes, and colors. Long gone are the days of only 12×12 Saltillo tile installation projects. Suppliers today should have a variety of options!

Saltillo Tile Colors

Saltillo Tile Shapes
Saltillo Floor Tile Requires Correct Installation Materials
Now that you’ve got sourcing quality presealed Saltillo tile tucked away, let’s talk about installation materials.
Installing Saltillo tile is simple, but the proper process must be followed using the correct installation materials. Learn more about How to Install Saltillo Tile.
Subfloor Prep Saves Time and Money
A crack-prevention membrane should be installed whether you have a concrete slab or plywood subfloor. (If you also need waterproofing subfloor prep (for outdoor concrete slabs or wet areas, choose a 2-in-1 product for efficiency).
- Aged concrete slab: An aged (as in not a new build project) concrete slab should be inspected for hairline cracks before installing Saltillo tile. It’s normal for these to exist. Apply the crack prevention membrane to all hairline cracks. This reduces the possibility of mirroring hairline cracks in the tile floor.
- New concrete slab: We recommend applying a crack prevention membrane across the entirety of a new slab to reduce the possibility of cracks in the tile floor as the slab continues to settle for several months.
- Plywood subfloor: After installing the cement board, apply a crack-prevention membrane to the cement board joints. Once again, this reduces the possibility of mirroring cracks in the tile floor. For more in-depth information, check out this article on wood subfloor installation.
Proper Thinset for Installing Saltillo Tile
Handmade Saltillo tiles are heavy and irregular in shape and thickness. Thus, a high-quality thinset must be used while installing Saltillo tile. Why? Cheap and low-quality thinsets are ideal for thin, lightweight, machine-cut tiles. Because clay tile is thicker and heavier, thinset must have enough strength and flexibility to adhere these tiles to the subfloor properly… and keep them there for the floor’s lifespan.
Improper thinset leaves homeowners with tiles that pop up in 6-12 months – costing time and money for repair work. So, it’s better to spend more money upfront buying high-quality semi or fully-modified thinset that will perform for the life of your floor.
The Good News – Buy Cheap Grout!
While we recommend investing in high-quality thinset, now you can save money by purchasing regular mortar mix for your Saltillo tile grout. Traditional mortar mix is inexpensive, works great, and looks excellent in its light gray color.
But if gray isn’t your Saltillo grout color choice, then source sanded grout. This type of grout has a plethora of color choices.
Most importantly, avoid being persuaded into purchasing special Saltillo tile grout. It’s not a picky tile – regular mortar mix or sanded grout are ideal. Explore more of our Saltillo Tile Grout Tips and find details on How To Clean Mexican Tile Grout!
Need Pricing For Your Next Project?
Tell us what you need and when you need it. Take advantage of our Lowest Price Promise & Worldwide Shipping. We are experts in Mexican Tile & Stone.
Circling Back to Sealer – Topcoat Sealer for Saltillo Floors
If you’re looking for bold color with your texture, then Superior Talavera is a wonderful choice. This durable tile has a unique relief texture and comes in both pattern and solid matte options. It looks absolutely divine inside and outside the home. It’s most popularly used as floor accents or as a Mexican tile backsplash.
You’ve got the presealed tile, crack and waterproofing membrane, thinset, and grout. The last piece of the Saltillo tile installation puzzle is the topcoat sealer.
Topcoat sealer is the final layer of protection applied after the Saltillo tile installation is complete. In fact, topcoat sealer for Saltillo adds a few essential benefits, including:
- Protection: You’ve already got water protection on presealed tiles. Next, high-quality topcoat sealers add scratch resistance and UV protection.
- Grout Sealer: Because topcoat sealer is applied after the floor is installed, it’s sealing grout too. No additional grout sealer is required.
- Sheen: Most high-quality topcoat sealers offer a variety of sheen levels – Satin, Low Gloss, or Gloss.
Pro Tip: Check out our How to Seal Saltillo Tile for more details!
Choose Saltillo Sealer That Saves Time and Money
Like our stance about avoiding cheap thinsets… yep, avoid inexpensive sealers. High-quality sealers have a higher price tag. But the investment will save time and money in the long run because they also last much longer than cheap sealers. Our TerraNano sealer has a lifespan of 10-15 years, while some big box store sealers have lifespans of 6 months.
Once again, a sealer is crucial in a Saltillo tile installation. If done correctly from the onset, you’ll enjoy a gorgeous floor for many years that requires little maintenance.
Pro Tip: Because we recommend buying and installing presealed (fully sealed) tiles, apply topcoat sealer that is chemically compatible with the sealer pretreated in the tiles. Additionally, consider the desired level of shine, durability, and maintenance requirements.
Wrapping up!
Hopefully, this post clarifies some things about installing Saltillo tiles. The process is simple when good tiles are purchased with proper, good materials. The result should be a good Saltillo floor that has worn well for many years. Here’s some other great info – 5 Things You Should Not Do with Saltillo Tile!
If you’re shopping for Saltillo flooring and installation materials, contact us. We’re happy to talk about your project! We are the Mexican tile experts and ship worldwide.